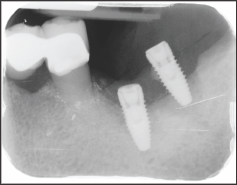
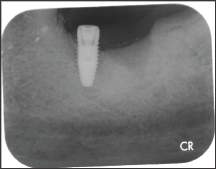
Showing posts with label Dentistry Open Access Journals. Show all posts

Monday, 24 April 2023

Lupine Publishers| Atypical Manifestation of a Tooth Crack

Lupine Publishers| Journal of  Dentistry and Oral Health Care

Abstract

A patient presented with severe pain in the area of teeth #2 and #31. Prior to seeking dental care, the pain had been so severe together with other clinical manifestations that the patient sought medical attention for a heart attack. After elimination of the occurrence of a m.i., the pain was thought to be dental in origin and dental care was sought. No carious lesions or endodontic problems were found upon radiographic examination. However, careful oral examination revealed the presence of a crack transcending tooth #31. Following tooth extraction and immediate implant placement, no further pain was experienced by the patient.

Introduction

Splits or fractures are the third most common cause of tooth loss in industrialized countries, primarily affecting maxillary molars and premolars, and mandibular molars [1]. However, most clinicians would agree that tooth cracks are difficult to diagnose [2- 4]. Although pain on biting is often considered the most reliable diagnosis for a tooth with a visible crack [5], the most common symptom of a cracked tooth is pain to cold [3]. Further, pain and other symptoms associated with tooth cracks can manifest in different ways, often in areas remote from the actual crack [1]. Interestingly, it has been reported that pain associated with tooth cracks are less likely in teeth with stained cracks or exposed roots, or in non-Hispanic whites [4]. This paper discusses the atypical pain caused by a root fracture in a molar tooth and which manifested in unexpected and misleading ways.

Patient Consultation

A 50 y.o. male patient in good general health presented with pain in the area of teeth #2 and #31. The patient was a dentist and reported that he had experienced severe pain on the left side of his face, with pain extending down his left arm together with heart palpitations and elevated blood pressure. Suspecting a M.I., the patient sought medical care but a visit to the Emergency Room together with blood tests indicated that the patient was not experiencing a heart attack. The pain was ascribed to dental issues on the right side of the face. However, the patient reported no pain on biting or sensitivity to cold.

Clinical Examination

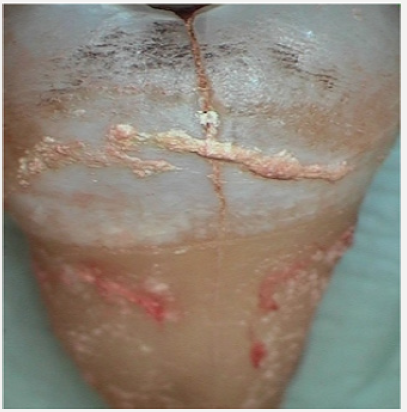
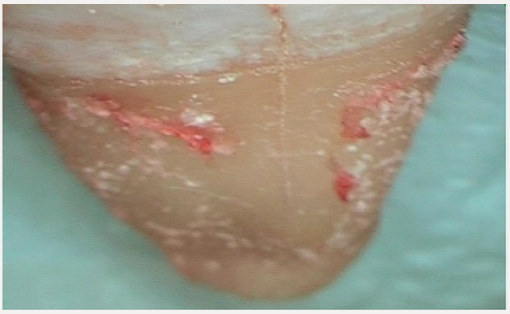
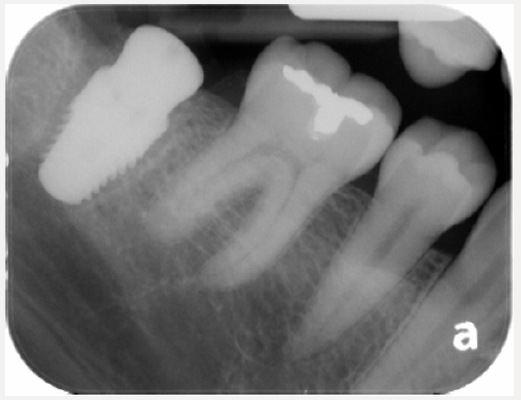
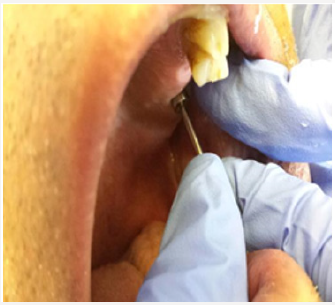
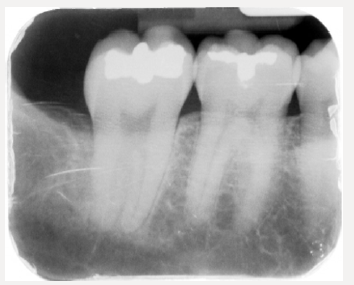
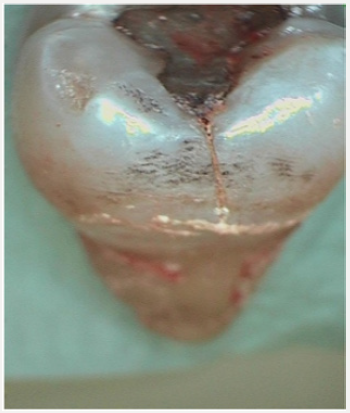
Radiographic examination of the patient, (Figure 1) indicated no carious lesions, sepsis or other issues with his dentition. However, careful intra-oral examination of the teeth indicated the presence of a crack on the distal surface of Tooth #31, (Figure 2). The crack appeared to have initiated from an apparently defective amalgam restoration, (Figure 3), and descended vertically to the apex of the tooth, (Figure 4). This conclusion appears to be justified because the literature indicates that a major predisposing factor to tooth fracture are mesio-occluso-distal restorations with mandibular first molar teeth being particularly affected [6]. Interestingly, the presence of calculus was noted in the buccal enamel and there are indications that this deposit caused widening of the enamel crack. No defects or lesions were noted in any other maxillary or mandibular teeth.

Figure 1: Radiograph of patient’s teeth.

Lupinepublishers-openaccess-dentistry-oralhealth

Figure 2: Intra-oral photograph of affected tooth.

Lupinepublishers-openaccess-dentistry-oralhealth

Figure 3: Intra-oral photograph of the affected tooth.

Lupinepublishers-openaccess-dentistry-oralhealth

Figure 4: Crack on the distal aspect of tooth #2.

Lupinepublishers-openaccess-dentistry-oralhealth

Treatment Regimen

In consultation with the patient, it was decided that the affected tooth could not be salvaged, and it was extracted under local anesthesia. Because the extraction site was infection-free, the periodontal condition was satisfactory, and the bone was solid and well-vascularized, an immediate implant was placed, (Figure 5).

Figure 5: Immediate implant placed following extraction.

Lupinepublishers-openaccess-dentistry-oralhealth

Prognosis

After extraction of tooth #31 and resolution of local anesthesia, the pain was immediately eliminated. Satisfactory healing and osseo-integration are projected for the affected area.

Conclusion

Cracks in teeth weaken them and pain from cracked teeth can be felt in areas remoted from the affected tooth. What was unusual in the present case is the pain was experienced on the other side of the mouth from the affected tooth and intensified to the point that the patient suspected a myocardial infarction. Although tooth crack-induced pain often can be experienced in areas remote from the affected tooth, the existence of pain, so severe that it mimicked a heart attack, and occurring on the other side of the mouth was unusual. This particular case reinforces the need for clinicians to carefully examine all facets of the dentition of patients presenting with oral pain. Cracks in enamel do occur and, as in the present case, may originate from a defective restoration. However, crack progression to the tooth apex and sudden, sharp onset of pain is unusual. Even more unexpected is that the pain was experienced on the opposite jaw to the affected tooth.

Read More About Lupine Publishers Journal of Dentistry and Oral Health Care Please Click on Below Link
https://lupine-dentistry-oral-health-care.blogspot.com/

Wednesday, 19 April 2023

Lupine Publishers| The Age Old Misnomer: Oral Pyogenic Granuloma–A Case Report

 Lupine Publishers| Journal of Dentistry and Oral Health Care


Abstract

An essential diagnostic challenge often faced by oral physicians is diagnosing soft tissue enlargements of the oral cavity. The fundamental reason being there are a diverse group of pathologic processes that can produce such lesions. Any intra-oral enlargement seen may represent a variation of normal anatomic structures, developmental anomalies, inflammation, cysts or even a neoplasm. Confined to these are the group of reactive hyperplasias of the oral cavity, which develop in response to a chronic, recurring tissue injury that stimulates an exuberant or excessive tissue repair response. Pyogenic granuloma comes under as one of the most common entities responsible for causing soft tissue enlargements.

Keywords: Pyogenic Granuloma; Oral Cavity; Inflammatory Hyperplasia; Misnomer

Introduction

Pyogenic granuloma is one of the inflammatory hyperplasia seen in the oral cavity [1]. It is not associated with pus as its name suggests and histologically it resembles an angiomatous lesion rather than a granulomatous lesion [2]. Thus, the term is a misnomer and in reality arises in response to various stimuli such as low-grade local irritation, traumatic injury or hormonal factors [1,2]. Typically, it presents as an exuberant, red painless mass that easily bleeds, ulcerates and grows rapidly and is frequently seen on the gingiva [3]. Surgical excision with linear closure allows histologic examination of the tissue. It also has the lowest rate of recurrence and is therefore the treatment of choice [4]. Hereby, we present a case of a 21-year-old male patient who presented with a growth on the gingiva and bleeding in upper front teeth region.

Case Report

A 21-year-old male patient reported with a growth behind the teeth in the upper front tooth region. The growth had first appeared two months back and had been slow growing to attain the present size. The patient gave a history of mild intermittent pain which aggravated on chewing food and was concerned about the compromised esthetics. His medical, dental and family histories were non-contributory. He was an avid pan and gutkha chewers since three years. On examination an exophytic growth on the palatal aspect of upper right canine between the right canine and first premolar was seen. The growth was irregular in shape, about one cm in size, smooth and lobulated (Figure 1A). It was pedunculated, soft in consistency and there was bleeding on provocation (Figure 1B). Based on the clinical examination we came to a provisional diagnosis of pyogenic granuloma. An excisional biopsy was carried out under local anesthesia (Figure 1C) and the report confirmed the same (Figure 1D). The patient was recalled after one, three and six months and it showed no recurrence of the growth.

Discussion

In 1844, Hullihen [5] described the first case of pyogenic granuloma in English literature. In 1897, pyogenic granuloma in man was described as “botryomycosis hominis.” Hartzell [6] in 1904 is credited with giving the current term of “pyogenic granuloma” or “granuloma pyogenicum.” It was also called a Crocker and Hartzell’s disease [6]. Angelopoulos histologically described it as “hemangiomatous granuloma” due to the presence of numerous blood vessels and the inflammatory nature of the lesion [7]. Cawson et al. [8] in dermatologic literature have described it as “granuloma telangiectacticum” due to the presence of numerous blood vessels seen in histological sections. They described two forms of pyogenic granulomas, the lobular capillary hemangioma (LCH) and the non-lobular capillary hemangioma (non-LCH) [2]. The exact etiopathogenesis remains unknown, although contributory factors include trauma, inflammation and infectious agents. Female sex hormones may also play a role as the condition occurs at increased frequency in pregnant women and in those who use oral contraceptive pills. It is believed that trauma and female sex hormones enhance expression of angiogenic factors such as basic fibroblast growth factor (bFGF) and vascular endothelial growth factor (VEGF) which will lead to evolution of the pyogenic granuloma. Medications such as isotretinoin, acitretin, cyclosporine, lamivudine, docetaxel, imatinib, and indinavir may also be contributing factors. Infections such as caused by herpes simplex type-I and Epstein-Barr virus have also been incriminated [4]. Oral pyogenic granulomas occur in all age groups, children to older adult, but are more frequently encountered in females in their second decade due to the increased levels of circulating hormones estrogen and progesterone [2]. Pyogenic granuloma of the oral cavity appears as an elevated, smooth or exophytic, sessile or pedunculated growth covered with red hemorrhagic and compressible erythematous papules, which appear lobulated and warty showing ulcerations and covered by yellow fibrinous membrane [9]. The color varies from red, reddish purple to pink depending on the vascularity of the growth. The gingiva, especially the marginal gingivais affected more than the alveolar part [10,11]. Besides the gingiva it is also noticed on the lips, tongue or buccal mucosa, affecting the maxilla more than the mandible, the anterior region than the posterior with the buccal surfaces being affected more than the lingual surfaces. The size varies from a few millimeters to several centimeters and it is usually slow growing, asymptomatic, painless growth, but at times it grows rapidly [9,10].

Differential diagnosis of pyogenic granuloma includes peripheral giant cell granuloma, peripheral ossifying fibroma, fibroma, peripheral odontogenic fibroma, hemangioma, conventional granulation tissue, hyperplastic gingival inflammation, Kaposi’s sarcoma, bacillary angiomatosis, angiosarcoma, and non Hodgkin’s lymphoma [12]. Radiographic findings are usually absent. However, Angelopoulos [7] concluded that in some cases long standing gingival pyogenic granulomas caused localized alveolar bone resorption [12]. Histologically, the lesion appears as a lobular proliferation of capillaries with each lobule containing a central feeder vessel surrounded by aggregates of capillaries [4]. The lobules are separated by a fibro-myxoid stroma. In those lesions that are undergoing regression, there may be extensive fibrosis [4,13]. For gingival lesions, excising the lesion down to the periosteum and scaling adjacent teeth to remove any calculus and plaque that may be a source of continuing irritation is recommended. Although surgical excision is the considered the treatment of choice, management of pyogenic granuloma depends on the severity of symptoms [3,14]. If the lesion is small, painless and free of bleeding, clinical observation and follow up are advised. Other treatment modalities include laser surgery, electrodessication. Injection of absolute ethanol, sodium tetradecylsulfate (sclerotherapy) and corticosteroids have also been tried with successful results in cases with recurrent lesions [15]. The prognosis is usually excellent, and the lesion usually does not recur unless inadequately removed. The recurrence rate is higher for pyogenic granulomas removed during pregnancy. Other possible reasons for recurrence include; incomplete excision, failure to remove etiologic factors, or due to re-injury to the area, making follow up necessary [14,16].

Conclusion

Despite the fact that pyogenic granuloma is a non-neoplastic growth in the oral cavity; a proper diagnosis, timely prevention and appropriate management are of utmost importance, careful diagnosis is essential to differentiate this lesion from other vascular lesions. Surgical excision of the growth, along with curettage should be done to prevent recurrences of this common lesion. And though the term pyogenic granuloma is still the used terminology of choice, it is a well-known fact that it is not associated with pus and histologically it resembles an angiomatous lesion rather than granulomatous lesion. Thus, it indicates that despite the term “pyogenic granuloma” being a misnomer, sometimes the good old quote - “Change is the only constant” gets a reality check as clearly time wants this terminology to stay in the literature books despite it lacking any accuracy at all.

Read More About Lupine Publishers Journal of Dentistry and Oral Health Care Please Click on Below Link
https://lupine-dentistry-oral-health-care.blogspot.com/

Monday, 20 February 2023

Lupine Publishers| How to Prepare Children with Autism to Visit a Dentist?

 Lupine Publishers| Journal of Dentistry and Oral Health Care


Opinion

One of the most common problems that parents with children with autism have is to take them to a doctor’s or dentist’s office. Even if the office environment is friendly and the dentist or doctor or their assistants are kind to the child, children who have autism do not like others to come close to them, touch them, and when they are alone, someone is in contact with their bodies. When children’s physical environment is invaded, they react to this behavior and do not cooperate with the other person, and sometimes they even become aggressive. It should be said that in many cases, these children are torn apart. There are many problems when a child visits a dentist’s office. For example, special smells, a tray of dental instruments, and devices and tools may pose a threat to the peaceful world of these children. For a child with autism spectrum disorder, a dental office is full of insecurity and, consequently, is an unpleasant place [1,2].

Preparation by Parents

Here are some simple solutions that parents can do to help their children with autism when they plan to go to the dentist’s office. Make a medical bag ready for your child; it is best to let him choose this bag by himself. Meanwhile, give him times to get acquainted with the tools inside the bag so that to find out what they are. After spending some time, show him what these tools are used for, and first try them on your own, siblings or someone else. The next step is to run the show with your child, pretending to be a doctor and treat him with these tools. Now ask your child to change his place with you, and let him try this tool on you, his sister or brother or someone else. You can also use a puppet or a stuffed doll or even your own pet to display these tools. Explain to your child what each device is used for, and let him access the toys toolbox and play with them freely. When friends, neighbors, and relatives come to your home, let them play with this gadget with your child, and then tell them to change their role with your child. Remember, if your child can find a playmate to practice with these tools, he will be great of help. If possible, give him a medical phone or more realistic tools to practice with them; however, in this case, you need to make sure your child is monitored and is safe. Give him a prize after each real meeting or show-up meeting with a dentist, or returning from the medical laboratory. Finally, play with your doctor’s true name when your child feels comfortable in the “Physician and Patient” game. In addition, along with this medicine toolbox, you can read books about meeting with the dentist too [3].

How to Take an Autistic Child to a Dental Office?

It can be difficult for every child to visit a dentist, but for a child with autism, referral to the dentist is very scary. Here are some tips for parents that will make this condition easier for their autistic children [4-6].

Before the Appointment

a. First Method: Try to get an appointment from dental centers that have been established for people with disabilities. These centers experience the treatment of disabled children and usually know what to do to make your child feel relaxed and happy during treatment. If your child needs something special at a specific time, please inform the center before visiting. You can also tell them about your child’s interests so that the dental center’s staff can talk to him about his interests while he is being treated [7].

b. Second Method: Consider the appointment for a day when your child is not busy. In order to minimize the stress on your child, it is advisable to rest well before going to the dentist. So, consider a day to visit that your child has not done much. This will reduce her stress and cry. In order to provide him with the ideal condition, it is advisable for the dentist to have free time before and after the visit so that he can cope with the situation well [8].

c. Third Method: Try to tell stories about the dentists for your child. Dentists are usually a frightening person for autistic children. So, if they know what happens when they are treated, their fear will be reduced.

d. Fourth Method: Talk to him about the fears your child may face. The mouth is a sensitive part of the body, and for some autistic children, this part has a special sensitivity. As a result, your child may have many concerns. Therefore, confirm his emotions and trust him; for example, you can tell him”It’s quite common for you to be afraid, so many people are afraid of a dentist. But I know this doctor. He always tries to be very careful and do his work the best. I know you do not want to go to dentistry, but the dental practitioner takes care of your teeth to make sure that they are healthy. We have to go there, but you may not love him. “

e. Fifth Method: Plan for a stimulus activity. For example: watching a movie, visiting his favorite park and even buying a small toy are things that can make your child happy. Before you go to the dentist, choose this activity and be sure it will be very helpful. Try telling your child about this encouraging activity, because he has hope for reaching that. For example: If your child has a lot of interest in the ribbons, tell him: “After dentistry, we go shopping and you can buy two ribbons.” As a result, when your child is in fear, he will think about his ribbons during the treatment. If you think that your child will be tired after dentistry, try to consider small activities. Do not use food as encouragement, because after the treatment, he cannot eat for a while.

f. Sixth Method: Give him food before leaving. Your child can not eat anything for a while after dental procedures. A hungry child is a child who easily cries and gets tired. Make sure your child has eaten her food, and then brush her teeth without any hurry [10-12].

When Visiting the Dentist

a. Method 1: Inform your child that you are ready to go to the dentist. Your child should brush his teeth before leaving the house. Let him bring something like a toy or any other device to the dentist office which makes him more comfortable. Do not hurry him because it can cause stress in your child. Try telling him the plan a few hours before you are leaving. This way, if needed, he can finish doing his work without any anxiety.

b. Method 2: Be extremely patient and kind. If your child is stressful, he will behave strangely because he actually fights emotionally. Be gentle and consider that it will not be easy for your child too. Try to do things in your car that your child is interested in. Play his favorite music, talk with him about your interests; or if he is interested in singing, try to sing a song together. You should know that your child needs to be assured about the condition; may ask you questions repeatedly, so give him a peaceful answer.

c. Method 3: Talk with the dental center staffs, and ask for help for the comfort and relaxation of your child. Perhaps they are able to create a situation in which your child can have a more pleasant visit to the dentist.

d. Method 4: Thinking of not being beside him, may cause this image that you are leaving him which may develop more fear and stress. Make assure your child that you would be in the waiting room if he will need you. If your child is getting disturbed by being away from you, ask the dentist to let you stay in the room with him.

e. Method 5: Encourage and admire her after the meeting. Tell her she has done this job very well, and keep on the encouraging activity you have been considering. This will make him feel better about doing anything. If your child has had bad conditions during the treatment (crying, screaming, etc.), you should tell him: “It’s not the courage to not be afraid, the courage is to face it, and you did it very well. Although the dentistry is scary and difficult, you did it “. Tell him you are proud of him [13].

Characteristics of Children with Autism

These children have certain behavioral characteristics, some of which include:

Impairment of speaking or not speaking at all, and repeating words and sentences spoken by people around him

i. Susceptible to restlessness and discomfort due to problems in the sensory process, anxiety, fears, and difficulty of communicating

ii. Exaggerated reactions to smells, voices, special tastes and other sensory incitements

iii. Excessive use of body movements to calm himself up, such as shaking hands and waving hands

iv. Failure to respond when calling his name so that the child seems to be deaf

v. Express the discomfort of breaking up routines and habits, and reacting to changes

vi. Restlessness and agility, the need to play and touch objects, and anything around

vii. Avoiding eye and physical contact

viii. Problems in social skills

ix. Obsessive-compulsive and adherence to them

x. Lack of effective self-perception of his feelings and others

xi. The difficulty in understanding security and risk aversion.

xii. Performing repetitive games for consecutive hours

Also, these children prefer to play alone and have little fancy imagination. Some may also have symptoms of hyperactivity and early angry [14].

Oral Condition in Children with Autism

Children with autism often have no differences with normal children in the structures of the teeth, but as these children tend to eat soft and sweet foods, they sometimes have muscle weakness around their mouth. As a result, the reduction in the efficiency of the chewing is observed, and even sometimes they tend to keep the mouthfuls long in their mouth, which increases the rate of caries in these children. Also, due to the inability to brush correctly, and the lack of proper cooperation with parents, caries, and gingivitis are more common in these children [15].

Read More About Lupine Publishers Journal of Dentistry and Oral Health Care Please Click on Below Link
https://lupine-dentistry-oral-health-care.blogspot.com/

Saturday, 4 February 2023

Lupine Publishers | Open Tray Impression Technique Using the Direct Pick-Up Coping: A Case Report

 Lupine Publishers | Journal of Dentistry and Oral Health Care


Abstract

Dental implants have become a quite successful method for restoration of fully and partially edentulous patients. Impression procedure becomes exacting in implantology as compared to fixed partial denture because of lack of periodontal ligament fibers in implants. Traditionally, there are two different implant impression techniques for transferring the impression copings from the implant to the impression. The transfer technique uses tapered copings and a closed tray to make an impression. Conversely, the pick-up impression uses square copings and an open tray (a tray with an opening), allowing the coronal ends of the impression coping screw to be exposed. This article describes the Pick-up implant impression procedure that is inexpensive, clean, and easy to perform with materials commonly found in a restorative dental practice and deals with its advantages and limitations.

Keywords: Implant Impression; Implant Direct Impression; Open Tray - Pick Up Impression Coping

Introduction

The success of implant-supported restorations relies on how well the hard and soft tissue information is transferred to the laboratory [1,2]. The critical aspect is to record the threedimensional orientation of the implant as it is present intraorally, other than reproducing fine surface detail for successful implant prosthodontic treatment [3-5]. The development of impression techniques to accurately record implant position has become more complicated and challenging. Several impression techniques have been suggested to obtain a master cast that will ensure the passive fit of prosthesis on implants [6]. In implant dentistry, the two traditional ways of making an impression are the closed tray and the open tray technique. Both impression techniques have their advantages and disadvantages [7]. A recent systematic review revealed that the open tray impression technique is more accurate than the closed tray impression technique [8,9]. It has been shown that the pickup type impression coping is the more accurate type of impression as errors occur on removal and replacement of the transfer type impression copings, especially in the occlusion-gingival direction [10,11]. Characteristics of the Pickup type impression coping are that they are removed from the mouth together with the set impression. They require access to the retaining screw to allow release of the screw prior to removal of the impression coping-impression assembly, the analogues are attached to the impression copings while they are embedded in the impression tray. A custom tray with access to the impression coping screws is required [12].

Clinical Case

Open Tray Impression Procedure

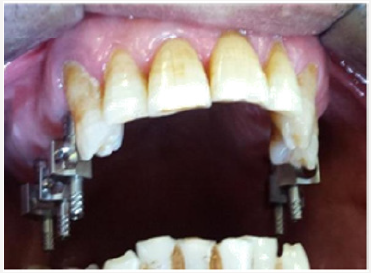
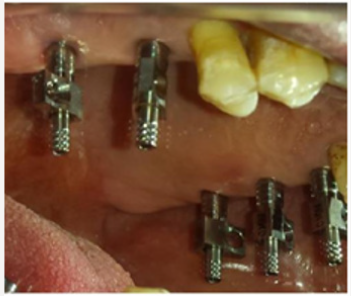
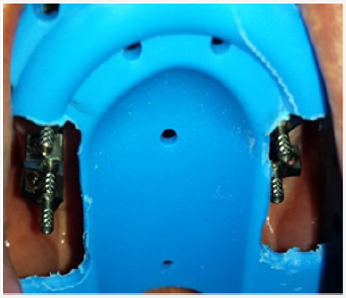
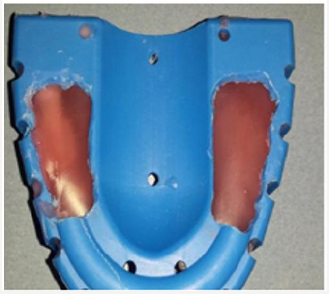
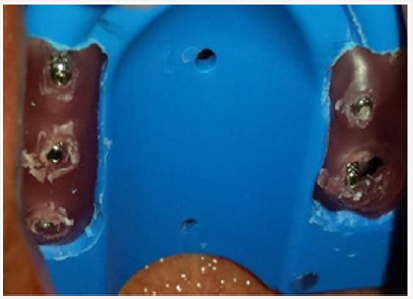
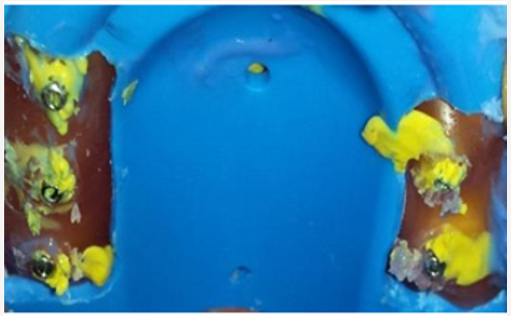
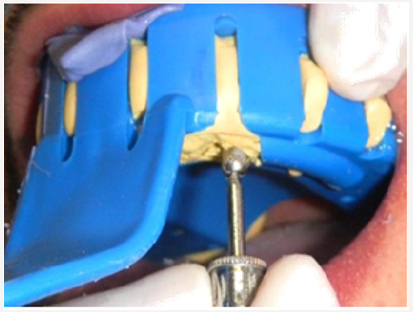
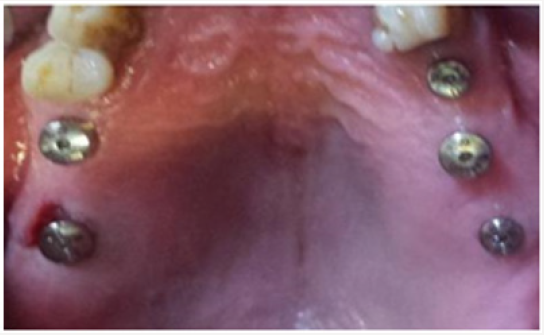
A patient consulted the Department of Fixed Prosthodontics at the Dental Clinic of Monastir to replace his bilateral terminal maxillary edentulism by implant-supported fixed prostheses . The patient had a sufficient and rectilinear mouth opening. We decided to make him five maxillary implants. To record the spatial position of the implants, we have chosen “Open tray Impression technique “using the direct pick-up copings . In the first time, the healing screws were removed (Figure 1). Then, the square impression copings were placed into the implants (Figures 2 & 3). The guide screws were tightened using the screwdriver. Retroalveolar X-rays were taken along the long axis of the implant to ensure that the impression copings were seated completely into the hex of the implants (Figure 1). The tray was perforated in the regions where implants were placed to provide access for the pick-up copings (Figure 4). The impression tray was coated with manufacturer recommended impression adhesive 5 minutes before each impression was made. Tray adhesive was applied thinly and evenly over the inner surface of each tray and extended approximately 3mm onto the outer surface of the tray along periphery. The adhesive was allowed to dry for 15 minutes before impression (Figure 4). The tray was removed from the mouth and two sections of boxing wax (Dentsply Intl) were adapted over the open-ings in the tray and sealed to the tray using a hot instrument (Figures 5 & 6).

Figure 1: Removing of healing screws.

Lupinepublishers-openaccess-dentistry-oralhealth

Figure 2: Impression copings were connected to each implant after removing of healing screws.

Lupinepublishers-openaccess-dentistry-oralhealth

Figure 3: Impression copings were connected to each implant after removing of healing screws.

Lupinepublishers-openaccess-dentistry-oralhealth

Figure 4: Intra oral view of pick up impression copings through the impression tray.

Lupinepublishers-openaccess-dentistry-oralhealth

Figure 5: two sections of boxing wax (Dentsply Intl) were adapted over the open-ings in the tray.

Lupinepublishers-openaccess-dentistry-oralhealth

Figure 6: two sections of boxing wax (Dentsply Intl) were adapted over the open-ings in the tray.

Lupinepublishers-openaccess-dentistry-oralhealth

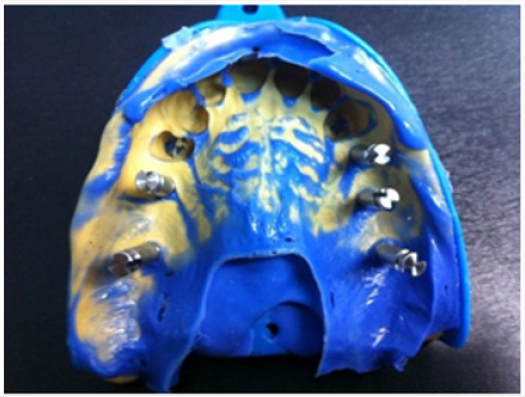
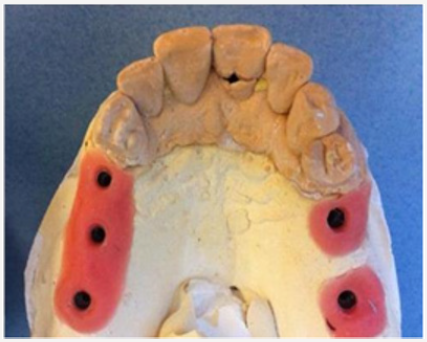
Other open-tray impression protocols recommend wiping off the excess impression material that extrudes through the hole in the tray with a gloved finger or injecting impression plaster through the hole(s) in the tray to fill the remaining void. This may be messy to accomplish. Additionally, the powder on some gloves may inhibit the polymerization of vinyl polysiloxane (VPS) impression materials Wax placed over the hole in the tray prevents contact of the impression material with the gloves [13]. The heavy consistency polyvinylsiloxane impression material was loaded inside the impression tray and light consistency polyvinylsiloxane impression material was meticulously syringed around the impression copings to ensure complete coverage of the copings (Figure 7). The screwdriver was used to loosen the guide screw within the impression post (Figure 8). The impression was taken out from the patient’s mouth. The corresponding analog was selected and the impression post was placed into the implant analog and the guide screw was tightened by using the screwdriver (Figure 9). The healing abutments were replaced immediately to prevent soft tissue collapse over the implant (Figure 10). Before screwing in, implant analog should be placed in line with the grooves of impression coping to achieve accurate passively fitting prosthesis. The impression was now ready to be used to create a model (Figure11).

Figure 7: Open tray Impression.

Lupinepublishers-openaccess-dentistry-oralhealth

Figure 8: The copings screws are unscrewed to be removed along with the impression.

Lupinepublishers-openaccess-dentistry-oralhealth

Figure 9: Impression with coping analog assembly.

Lupinepublishers-openaccess-dentistry-oralhealth

Figure 10: The healing abutments were replaced immediately.

Lupinepublishers-openaccess-dentistry-oralhealth

Figure 11: Occlusal view of hard and soft tissue cast recovered from impression.

Lupinepublishers-openaccess-dentistry-oralhealth

Discussion

In direct technique, the impression coping lies within the impression. Advantages of direct technique are minimization of dimensional changes in impression upon removal from patient’s mouth, no need to screw in coping again as it comes along with the impression and useful in patients with angulated implants [14]. When impressions are required for multi implant restorations the precision of the impression is even more critical. This is because frameworks will be constructed from the master cast and mis-fit in the frameworks can lead to stress applied to the implants on screwing down the framework [12]. For situations in which there were three or fewer implants, most studies showed no difference between the pick-up and transfer techniques, whereas for situations in which there were 4 or more implants, more studies showed more accurate impressions with the pick-up technique (open tray) than the transfer technique (closed tray) [6]. Fourteen studies compared the accuracy of pick-up and transfer impression techniques [15,16]. Of the 14 studies, five showed more accurate impressions with the non-splinted pick-up technique [17], two with the transfer technique, and three showed no difference between them [8,18].

Closed tray (transfer, indirect) technique using tapered impression copings is an easy and simple technique ideal for single implant impressions and multiple parallel implants in patients with limited mouth opening [14]. When there is limited mouth opening they can be used as there may not be sufficient space for access to the screws retaining pick up type impression copings with the impression in place and in patients with an exaggerated gag reflex, when the impression has to be removed as quickly as possible [12]. The clinical situations which indicate the use of the closed tray technique are when the patient has limited inter arch space, tendency to gag, or if it is too difficult to access an implant in the posterior region of the mouth [10].

Polyether and VPS were the recommended materials for the implant impressions. Results indicated that the 2-step VPS impression was significantly less accurate than the 1-step putty and light-body VPS combination impression, the mediumbody VPS monophase impression, and the medium-body polyether monophase impression [5].

Conclusion

Several impression techniques have been advocated for implant impressions to obtain a definitive cast. Different impression techniques have some advantages and some limitations, but selection of technique depends upon operator choice and various clinical situations. Open tray (pick-up, direct) technique using square impression copings is more accurate method usually preferred in multiple implants with different angulations.

Read More About Lupine Publishers Journal of Dentistry and Oral Health Care Please Click on Below Link
https://lupine-dentistry-oral-health-care.blogspot.com/

Monday, 9 January 2023

Lupine Publishers| Open Tray Impression Technique Using the Direct Pick-Up Coping: A Case Report

 Lupine Publishers| Journal of Dentistry and Oral Health Care


Abstract

Dental implants have become a quite successful method for restoration of fully and partially edentulous patients. Impression procedure becomes exacting in implantology as compared to fixed partial denture because of lack of periodontal ligament fibers in implants. Traditionally, there are two different implant impression techniques for transferring the impression copings from the implant to the impression. The transfer technique uses tapered copings and a closed tray to make an impression. Conversely, the pick-up impression uses square copings and an open tray (a tray with an opening), allowing the coronal ends of the impression coping screw to be exposed. This article describes the Pick-up implant impression procedure that is inexpensive, clean, and easy to perform with materials commonly found in a restorative dental practice and deals with its advantages and limitations.

Keywords: Implant Impression; Implant Direct Impression; Open Tray - Pick Up Impression Coping

Introduction

The success of implant-supported restorations relies on how well the hard and soft tissue information is transferred to the laboratory [1,2]. The critical aspect is to record the threedimensional orientation of the implant as it is present intraorally, other than reproducing fine surface detail for successful implant prosthodontic treatment [3-5]. The development of impression techniques to accurately record implant position has become more complicated and challenging. Several impression techniques have been suggested to obtain a master cast that will ensure the passive fit of prosthesis on implants [6]. In implant dentistry, the two traditional ways of making an impression are the closed tray and the open tray technique. Both impression techniques have their advantages and disadvantages [7]. A recent systematic review revealed that the open tray impression technique is more accurate than the closed tray impression technique [8,9]. It has been shown that the pickup type impression coping is the more accurate type of impression as errors occur on removal and replacement of the transfer type impression copings, especially in the occlusion-gingival direction [10,11]. Characteristics of the Pickup type impression coping are that they are removed from the mouth together with the set impression. They require access to the retaining screw to allow release of the screw prior to removal of the impression coping-impression assembly, the analogues are attached to the impression copings while they are embedded in the impression tray. A custom tray with access to the impression coping screws is required [12].

Clinical Case

Open Tray Impression Procedure

A patient consulted the Department of Fixed Prosthodontics at the Dental Clinic of Monastir to replace his bilateral terminal maxillary edentulism by implant-supported fixed prostheses . The patient had a sufficient and rectilinear mouth opening. We decided to make him five maxillary implants. To record the spatial position of the implants, we have chosen “Open tray Impression technique “using the direct pick-up copings . In the first time, the healing screws were removed (Figure 1). Then, the square impression copings were placed into the implants (Figures 2 & 3). The guide screws were tightened using the screwdriver. Retroalveolar X-rays were taken along the long axis of the implant to ensure that the impression copings were seated completely into the hex of the implants (Figure 1). The tray was perforated in the regions where implants were placed to provide access for the pick-up copings (Figure 4). The impression tray was coated with manufacturer recommended impression adhesive 5 minutes before each impression was made. Tray adhesive was applied thinly and evenly over the inner surface of each tray and extended approximately 3mm onto the outer surface of the tray along periphery. The adhesive was allowed to dry for 15 minutes before impression (Figure 4). The tray was removed from the mouth and two sections of boxing wax (Dentsply Intl) were adapted over the open-ings in the tray and sealed to the tray using a hot instrument (Figures 5 & 6).

Figure 1: Removing of healing screws.

Lupinepublishers-openaccess-dentistry-oralhealth

Figure 2: Impression copings were connected to each implant after removing of healing screws.

Lupinepublishers-openaccess-dentistry-oralhealth

Figure 3: Impression copings were connected to each implant after removing of healing screws.

Lupinepublishers-openaccess-dentistry-oralhealth

Figure 4: Intra oral view of pick up impression copings through the impression tray.

Lupinepublishers-openaccess-dentistry-oralhealth

Figure 5: two sections of boxing wax (Dentsply Intl) were adapted over the open-ings in the tray.

Lupinepublishers-openaccess-dentistry-oralhealth

Figure 6: two sections of boxing wax (Dentsply Intl) were adapted over the open-ings in the tray.

Lupinepublishers-openaccess-dentistry-oralhealth

Other open-tray impression protocols recommend wiping off the excess impression material that extrudes through the hole in the tray with a gloved finger or injecting impression plaster through the hole(s) in the tray to fill the remaining void. This may be messy to accomplish. Additionally, the powder on some gloves may inhibit the polymerization of vinyl polysiloxane (VPS) impression materials Wax placed over the hole in the tray prevents contact of the impression material with the gloves [13]. The heavy consistency polyvinylsiloxane impression material was loaded inside the impression tray and light consistency polyvinylsiloxane impression material was meticulously syringed around the impression copings to ensure complete coverage of the copings (Figure 7). 

Read More About Lupine Publishers Journal of Dentistry and Oral Health Care Please Click on Below Link: https://lupine-dentistry-oral-health-care.blogspot.com/

Monday, 29 August 2022

Lupine Publishers| A Standard Pediatric Dental Clinic

 Lupine Publishers| Journal of Dentistry and Oral Health Care


After 22 years of experience in pediatric dentistry, as well as working in various pediatric clinics and collecting materials over the years a standard pediatric dentistry clinic can be designed and launched. Therefore, a standard design and decoration of a clinic will have a significant impact on the success of the clinic.

Dentistry decoration is very important and influential in the morale of patients, especially in children; and it should be designed in such a way to give patients a sense of relaxation and comfort. In order to be successful in designing a dental office environment, you need to know enough about the science of color and lighting design and the correct layout of the necessary equipment in the office space, so you can design a stylish and functional decor for dentistry, especially for children. In the design of the interior decoration of the office, you have to master the internal and external environment of the building, the principles of lighting, and the proper layout of medical equipment, so that you can make the right design using the correct and integrated design.

Remember to use the rules of the architecture of the day in the world as much as possible to design interior decoration so that with the help of these sciences and laws you can design a clinic that is very special and relaxing. Choose the effects of colors in terms of color and design that make patients feel more comfortable. Nowadays, dentists use a lot of ways to attract customers. One of them is to put a staff member to advertise their work and explain the services and benefits they offer as well as someone who invites you to visit different parts of the clinic like a tour to explain the various functions of each space. Many modern dental clinics are equipped with amusement and recreational facilities, specially designed children’s reception areas and even relaxation spaces. Adaptive space design elements such as ceiling height, doors, woodwork s, lighting, and painting must all be carefully designed to create a favorable atmosphere for referrals patients.

Clinic Spaces

Have you ever thought that what kind of spaces should be used by a standard dental clinic? In other words, what specific rooms do you have in your clinic? Generally, each pediatric dental clinic should be equipped with eleven completely separate spaces.

a) Receptions area and File archive

b) Waiting room for parents

c) Management room

d) Play room

e) Dentist’s private office

f) Examination room

g) Treatment room

h) Radiography room

i) Central Sterilization center

j) Dental lab

k) Supporting department

Reception area

The admission section is the first space that visitors enter, so it can be of great importance to design. Because patients will judge and view details of the entire project when they enter the reception area. Therefore, the design of this space should be such that it attracts them. In general, the admission section should convey the sense of inviting and welcoming. For the office clerk, who is responsible for accepting patients and archiving file an appropriate place must be considered for her. The admissions section should be such that the patients sit on one side and the office staffs stay on the other side. At the same time, visitors can talk to the staff at the reception desk and fill in the necessary forms.

Waiting room for parents

The second part should be considered for patients who come to the dentist’s office. Pediatric patients are better off staying in their waiting room before the treatment begins. Many modern dental clinics are equipped with a laptop and mobile phone charging stations at the coffee shop, which they can take advantage of these during their children’s treatment. Some clinics also have foot massage devices, as well as a place to show new oral and dental products, all of which are an example of this new facility. In some clinics, there is a special area to use for the aquarium. The installation of a special shelf for a variety of magazines and books can give parents entertainment. It is better to have separate bathrooms for children and adults in the corner of the hall.

Management room

In the design of the management room, the goals are determined by types of decorations and designs. The management room should represent the personality, authority, ability of a good manager. In fact, this decoration tells the patient that the manager has his own rules. When entering the room, the patient must understand that it can be trusted by the manager, regardless of the type of contact, the appearance of the manager, the arrangement of the furniture and any details about it.

In addition to the type of office arrangement, one should also be sensitive to the colors used. Never use fancy colors for interior design. Colors with a cream range and a combination of cream colors with white and light brown are the most suitable colors for the interior design of office chairs. The interior lighting of the room is also very important. It’s better to use modern lighting to make the management room decorations more attractive.

Play room

When designing a dental clinic for children, by installing posters of popular children’s characters on the wall or putting toys in the waiting room, you would encourage them to come to the clinic. If your clinic has a great deal of space, with a number of small play tables, you can create an environment where children can draw and play together. The use of creative children’s designs and bright and cheerful colors in the interior decoration of the dentistry takes the child’s mind out of the atmosphere of the dental space. For the kid’s waiting room, you can use children’s cartoon images and characters, in the form of posters on the walls; or have a shelf of full of toys to play. In this environment, children will be away from the noisy environment and adults’ complaints; and they will be more comfortable with their peers in the room, with no fears and concerns. Installing DVDs or TVs to play animations is another important thing that can entertain children. If the waiting room is large enough, considering a playground is a very interesting and tempting idea to attract children.

Dentist’s private office

The private office is becoming increasingly important in design with the belief that it is important for the dentist to have “private” areas to rest there during the day for mental breaks. It is better to have a comfortable sofa, or even beyond that a recliner chair equipped with a massage device in the room so that remove fatigue from the dentist’s body. Large windows always give e sense of peaceful atmosphere and make the psychological break more relaxed and smooth. Consider a private closet and bathroom to accompany the office.

Examination room

It is designed for initial patient examinations. Of course, in most clinics, this room has been integrated into the treatment room due to lack of space. But for a pediatric dental clinic, the separation of such a room is essential for children, because for the initial examination it is not necessary for the child to go to the treatment room and have too much anxiety. It should be noted that this is the first place a child gets familiar with the dentist. In addition, this room should create a feeling of a happiness and childish atmosphere in the child. In the examination room, we have to try to create a stressfree space where the child would feel more comfortable. A dental environment should be a happy and comfortable place for children. Therefore, the principle design of this room is very important for the initial impact on the child.

The examination room and treatment room to some extent in terms of instrumental layout and decoration arrangement should be different. Having options such as colored dresses or dresses with children’s favorite cartoon characters, masks and colored gloves in this room, will have an impressive effect. It would be more impressive if pediatric dental chairs are characterized by different special childish designs.

The walls of the examination room should be in bright colors and decorated with special posters for kids. Near the dental chair, there should be oral hygiene kits including baby doll toothbrush, children’s toothpaste, and a dent form. On the dental chair, devices such as kid’s dental turbines, kid’s handpieces with a rubber tip on it, and small monitors to be installed. By doing this strategy, you can prepare a good background for children to familiar with the environment and some of the dental instruments.

Treatment room

The next space includes the patient treatment ward. The dental chair in the treatment room is a device that the patient undergoes for the duration of the treatment while at the same time tolerates dental panic and anxiety. A dental unit with a variety of instruments, such as the turbine, handpieces, suction, lamp, etc. may be daunting for children who are going to the dental office for the first time. For a pediatric dental clinic, this room is one of the most important parts of the clinic. This room is a place where the child should not get anxious and stressed when arriving. Therefore, it must be designed and installed in such a way that the patient feels calm and comfortable. The atmosphere inside the treatment room should be cheerful and childish. Dental units with pediatric designs should be replaced by the conventional units. The color of the room and the units should be cheerful and relaxing. In the decoration and design of this room, there must be a special creativity that upon the arrival, the child does not have the feeling to be taken to the dentist’s office.

Instead, he will have the feeling that he has entered into a friendly and childish environment or imaginary space. To reduce the stress on children, place a dental chair in front of your office window. You can bring mental relaxation to your treatment room if you follow these principles:

1) If the office room is on the ground floor and adjacent to the courtyard, you can use full-glass windows: and plant all kinds of greens and flowers in the garden opposite these windows.

2) If the room is on the floor of a building with its window opening to the leaves of the trees, you can give a Stunning and tranquil view to patient’s eyes on the dental unit.

3) But in some cases, your office may be in the basement of a building and the room where the unit is to be installed does not have a window; in this case, you can hang a beautiful, relaxing painting in front of the dental chair

You can even have an aquarium with different fish in front of your unit. Various studies have shown that water and slow motion of fish can be effective in reducing anxiety and stress in patients. As another step, you can put headphones on your unit for the patient, and play light and relaxed music; or, let the children’s music spread through the speakers with a gentle tone of voice. Sometimes the installation of a television in front of the unit can also be effective because the patient’s mind focuses on other programs and images. And their minds divert the issue of pain and fear from the dental environment to other issues.

Radiography room

Regardless on which wall the x-ray machines are placed, make sure that the equipment and chair are positioned to allow ease of access to both left and right sides of the mouth. Many offices plan for a panographic radiographic machine even if they do not currently have one. The installation of a suitable air suction device in the radiographic room is mandatory. The radiograph door must have a lead of 2 millimeters and be fitted with appropriate grips and hinges for the door. Today, many dental offices make use of digital radiography.

Central sterilization room (CSR)

To control the infection, this is the area that provides the facilities for washing the clothes in the same environment so that employees do not have to carry clothes with them to wash them home or out of the health environment. This is also a special room to sterilize all instruments used daily. This section includes a washing room, an ultrasonic machine, an oil machine, a pack unit, an autoclave unit and other necessary pieces of equipment.

Dental laboratory

You can design the lab outside the range and in the hallway or separate it with one in the treatment room. If a laboratory space is included in the clinic design, it is better to place this room at the very end of the clinic space away from the treatment room and playroom. This will reduce the sound emission from the lab, which is a factor in exacerbating stress in children and parents. Some dentists prefer to use a lab in the city

Supporting department

The final part of the clinic space is including a staff break room, a changing room, a small kitchen for staffs and a warehouse of materials and equipment.

Tips for choosing color and light for a dental clinic

Can you imagine the world around you without any color? Each color has a special physical and emotional effect on the viewer, and people have different reactions to different colors. Color, light, and water can help you create a clear and vivid environment in the office. First of all, you have to pay attention to what color you are interested in? Do you prefer to use gentle colors for walls and units or use energy colors that inspire a happy mood in you and your patients?

Undoubtedly, the use of happy colors is very important for designing the baby’s waiting room. In choosing your color scheme, you need to be careful about matching colors. The use of bright colors like light blue or cream makes the office space wider. The use of mirrors can also help to make the office larger. Mild colors can also affect the patient’s inner peace.

You can also use a colorful background for the waiting room and the treatment room, and only consider the degree of darkness and brightness of the color in these two rooms. It is better to use the same color for the waiting room and the treatment room. In this situation, patients who got familiar with the reception room before entering the treatment room will get familiar with the new environment without any stress.

Avoid using absolute white or yellow light, to create a light like daylight by combining these two colors by installing suitable lamps. Choosing the tooth color for all types of composites and ceramics is easier and more accurate in these light conditions. Also, the use of natural herbs brings a refreshing effect to your clinic and helps to stimulate relaxation. Colors that are commonly used in the design of the clinic environment are bright colors. White is at the top of these colors and is almost the first color that reminds you of a Treatment room. The use of white color in this space cannot be simply attributed to its conventionality. The white color is a color that reflects the light well, while at the same time special beauty. This color is also very effective in making people feel relaxed. So, the white will be the first color to be offered in the decoration design of the clinic.

Read More About Lupine Publishers Journal of Dentistry and Oral Health Care Please Click on below Link: https://lupine-dentistry-oral-health-care.blogspot.com/

Tuesday, 10 August 2021

Lupine Publishers| Atypical Implant Failure

 Lupine Publishers| Modern Approaches in Dentistry and Oral Health Care


Abstract

With an average survival rate of 95%, the endosseous dental implant is one of the most successful and predictable innovations in modern dentistry. The factors contributing to the success, and failure, of dental implants are now well-established [1-6] and include the oral and systemic health of the patient, patient age, implant type, implant surface, implant length, bone type, surgical site (mandible or maxilla), type of surgery (one- or two-stage) and immediate (fresh socket) or delayed implant placement. Other important aspects regarding the success of an implant include the skill, experience and, apparently gender, of the surgeon [7]. Early implant failures, a prevalence of about 5.6%, most often is observed in edentulous upper jaws, notably with implants having a turned surface. There is some controversy as to whether pre- and post-operative antibiotic coverage is needed, but overall antibiotic therapy can be helpful but apparently is only essential when infection is present.

Clinical

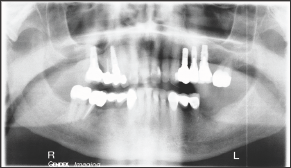
A healthy, well-nourished 76 year old man without systemic or oral diseases presented with missing teeth in tooth positions #18 and #19. The patient previously had successful implant surgery together with a sinus lift in the maxilla some years prior to the present surgery. The patient had no history of metal allergies and satisfied the selection criteria for successful implant surgery Pre-operative radiographs, Figure 1, showed that the bone at the surgical site was compact and well-vascularized. The satisfactory bone conditions at the implant sites were confirmed by CT scan. After fabrication of a placement template for the implants, sockets for the implants was prepared using the Nobel Biocare tapered osteotomy drill kit, utilizing the 2 mm twist drill, the 3.5 mm drill, the 4.3 mm drill and the 4.3 mm dense bone drill.

Figure 1: Pre-operative Panorex of the patient oral cavity.

Lupinepublishers-openaccess-dentistry-oral-healthcare

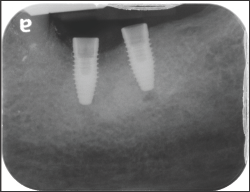
The placed implants were Nobel Biocare tapered conical implants, 4.3 mm diameter x 10 mm length. The implants were placed by the same surgeon in positions 18 and 19, Figure 2. No antibiotic coverage was deemed necessary because there was no evidence of infection at the surgical site. Four months after implant placement, the implant at tooth #18 started to extrude, Figure 3, followed by complete loss of the implant within 5 days. Follow-up radiographs and clinical examination showed no indications of infection at the implant site, Figure 4. There was no indication of epithelial down growth surrounding the implant at any time, and no soft tissue residue was noted on the revered implant.

Figure 2: Post-operative radiographs of placed implants.

Lupinepublishers-openaccess-dentistry-oral-healthcare

Figure 3: Post-operative surgical site at 4 months.

Lupinepublishers-openaccess-dentistry-oral-healthcare

Figure 4: Post-operative radiograph 5 days after loss of implant.

Lupinepublishers-openaccess-dentistry-oral-healthcare

Discussion

This implant failure appears to have no simple explanation. Implant failure within 6 months of placement is uncommon, occurring in about 5% of all cases. However, many of the recognized factors contributing to early failure did not apply in the present case. Both implants were placed by the same very experienced male surgeon. Further, there were no signs of pre-operative or postoperative infection and the surgical site was in the mandible rather than the maxilla, the latter being the more common site for early implant failure [7]. Interestingly although recent research suggests that the administration of prophylactic antibiotics may significantly reduce the prevalence of dental implant failure under ordinary conditions but certainly when infection is present or might be anticipated. Neither situation was present in this particular case.

It is possible that the design of the implant might have contributed to failure although when an identical implant was placed in the bone adjacent to #18, there appears to be satisfactory osseous integration. Overall, there appears to be no logical explanation for this individual implant failure since none of the potential contributory factors to early failure apply in this particular case. It is proposed that a different design of implant will be placed in 4-6 months’ time after complete healing of the implant site. Prior to surgical site preparation and implant placement, the authors intend to closely monitor both patient and the mandible to ensure success of the next surgery

Conclusion

Although the endosseous dental implant is one of the most successful and predictable innovations in modern dentistry and all factors contributing to the success of dental implants were satisfied in this particular case, failure still occurred. Operator skill and expertise were not in question in this case because the surgeon has placed over 2000 implants without incident over a period of years. The reason for failure is not clear and, certainly, implant #19 was deemed to be successful. The final conclusion to be drawn is that implant failures can occur for inexplicable reasons and from no readily ascribable causes.

Read More About Modern Approaches in Dentistry and Oral Health Care Please Click on Below Link: https://lupine-dentistry-oral-health-care.blogspot.com/


Sunday, 20 June 2021

Lupine Publishers| Combined Digital and Traditional Bite Registration

 Lupine Publishers| Modern Approaches in Dentistry and Oral Health Care


Introduction

A high percentage of dental restorative procedures failure is attributed to the failure of maintaining the patient's occlusal patterns, and this fact becomes more and more valid as the restoration is more and more extensive. Our need to evaluate the distribution and the quality of occlusal forces is of a growing importance along with our growing knowledge of the masticatory system's sensational perception in the Central Nervous System, keeping in mind that the CNS potential adaptation is of a limited capacity and this is related to some individual factors of the patient (age is a major factor).

Among the symptoms of inaccurate bite registration:

    i. Functional difficulty, may reach the extend of refusal and rejection of the assumed restoration

    ii. Distortion of speech, swallowing and breathing

    iii. Headaches, Ear pain, vision distortion, throat and neck pain

    iv. TMJ dysfunction

This concept applies to all kind of restorations including fillings, crowns and bridges, but it is very important in two special cases;

    A. Comprehensive Dental Treatment under General Anesthesia

    B. Full mouth rehabilitation

The digital bite registration can give.com a good idea about the patient's bite patterns before commencing any procedure, so we have an idea regarding the forces distribution and what are the needed modifications if any is undoubtedly needed and the quantity and quality of the required modifications.

The added conventional method is to create a stable position of the tray, so we can use it and reuse it as required without taking the risk of a new bite patterns when checks up are repeated. We can use any bite registration semi fluid material (silicon) keeping in mind the fast setting (20 seconds) plasticity and relative stability. This method will enable.com to avoid taking impressions to create models and usage of bite registration papers (blue papers). It is an accurate way to control and study new contact points in a scientific, up to date, readable and reliable procedure.

i. Choose the appropriate size of the bite tray (Figure 1).

Figure 1:

ii. Apply material on both sides (Figure 2).

Figure 2:

iii. Reasonable material thickness (4 to 5 mm) (Figure 3).

Figure 3:

    iv. Elimination of material in respect to the presumed treatment areas while trying to preserve tow points of contact on each side or at least one point on each side (Figure 4).

Figure 4:

    v. This technique is still under technical development and needs more clinical trials to achieve its most complete specifications (Figure 5).

Figure 5:

Some modifications might be implemented on the used materials (trays) simplifying the data reading and better understanding the brain interpretation to these stimulating signals.

Read More About Lupine Publishers Modern Approaches in Dentistry and Oral Health Care Please Click on Below Link: https://lupine-dentistry-oral-health-care.blogspot.com/


Wednesday, 12 May 2021

Lupine Publishers| Rehabilitation of Atrophic Maxilla using Pterygoid Implants: Case Reports

Lupine Publishers| Modern Approaches in Dentistry and Oral Health Care


Abstract

Restoration of a severely atrophic jaw presents a challenge in dentistry. Bone augmentation is usually required in the posterior maxilla to enable placement of a sufficient number and length of implants to support implant prosthesis due to the poor bone quality of the posterior maxilla. The recent invention of new surgical techniques and implant systems help circumvent the current restorative problems and provide a solution to erstwhile un-rehabilitated cases. The use of pterygoid implants in the pterygo-maxillary region provides posterior bone support without sinus augmentation or supplemental grafts. This article describes a clinical procedure for the restoration of severely resorbed maxilla using a new pterygoid implant in combination with conventional or cortically fixed implant system. In the present study, the use of implants in the posterior maxilla to support a fixed prosthesis was demonstrated to be a reliable and a good alternative to distal cantilever prostheses or sinus-lifting procedures.

Keywords: Atrophic Jaw; Pterygoid Implants; Pterygo-maxillary Region; Edentulous Patient; Rehabilitation

Introduction

Restoration of a severely atrophic jaw presents a challenge in dentistry. The poor bone quality of the posterior maxilla, coupled with limited vertical bone height due to sinus pneumatisation and chronic periodontitis often leaves insufficient bone for implant anchorage [1,2]. Bone augmentation is usually required to enable placement of a sufficient number and length of implants to support implant prosthesis [3,4]. Many procedures, such as onlay grafts, free or micro vascular bone grafts, transport distraction osteogenesis, and apposition grafts with or without a Le Fort I osteotomy are well documented and have success rates of between 60-90% [5-9]. These often involve invasive and lengthy surgeries, long treatment time, and some morbidity [6-8]. Furthermore, free bone grafts are commonly associated with resorption during healing [5,9]. Zygomatic Implants have been used to provide support for oral rehabilitation where there has been a substantial amount of bone loss from the upper jaw, and where ordinary dental implants are not sufficient for prosthetic support [2,10].

Still, some severe atrophic jaw cases defile these current treatment options. Continuous advances in dentistry have resulted in the invention of new surgical techniques and implant systems that circumvent the current restorative problems and provide a solution to erstwhile un-rehabilitated cases. One of such is the use of Pterygoid implants to rehabilitate posterior maxillal. Placement of implants in the pterygomaxillary region provides posterior bone support without sinus augmentation or supplemental grafts. This article describes a clinical procedure for the restoration of severely resorbed maxilla using a new terygoidimplant in combination with conventional or cortically fixed implant system.

The Pterygoid Implant

The pterygoid implant is anaxial implant placed through the maxillary tuberosity with fixation apically in the pterygoid process of the sphenoid bone and the pyramidal process of the palatine bone. Pterygoid implants were first proposed by Linkow in 1975 [11] and the method was first described by JF Tulasne in 1992 [12]. These implants are relatively long and specifically manufactured with the characteristics of the pterygoid region in mind. The implant was introduced to solve the problem of implants restoration in the posterior maxilla due to the presence of the maxillary sinusand as a result of limited quantity and poor quality of available bone in this region [1]. Support for pterygoid implantsis derived from the tuberosity of the maxillary bone, the pyramidal process of the palatine bone, and the pterygoid process of the sphenoid bone [13]. The length of pterygoid implant ensures that the implant can cross the mucosa (which is often thick in this region) and engage the implant apex in the cortical bone of the pterygopalatine suture.

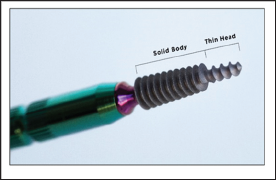
Figure 1: Pterygoid implant.

Lupinepublishers-openaccess-dentistry-oral-healthcare

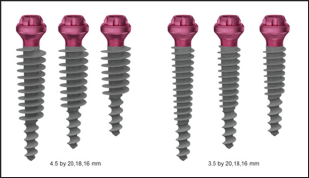
Pterygoid implant passes through the maxillary tuberosity and the pyramidal process of palatine bone to engage the pterygoid process of the sphenoid bone [13,14], its length ranges from 16 to 20 mm, they have a pointed, self-tapping apex to ensure strong anchorage when inserted. The implant neck has a wide thread profile which provides compression in the region of the tuberosity, where the bone is often of low density (Figure 1). New Pterygoid implants designed under the guidance of Henri Diederich, Luxembourg with the collaboration of the Swiss company TRATE are surface treatedithhydroxyapatite/tricalciumphosphate (HA/ TCP) and have a conical shape with compressive threads. The implants are of 3.5 or 4.5 mm diameter with a length of 16, 18, 20 mm respectively (Figure 2).
Figure 2: New Pterygoid implants from TRATE.

Lupinepublishers-openaccess-dentistry-oral-healthcare

Surgical Technique

The placement of implants in the pterygoid process requires surgical experience and detailed knowledge of the anatomy of the posterior maxillary region. Various surgical techniques for implant insertion in this region have been described in the literature. The standard surgical technique involves; making a full-thickness crestal incision on an edentulous crest as far as the back of the tuberosity, and extended by a vestibular releasing incision after anaesthesia of the region is achieved with a local anaesthetic solution. The incision design is such that the entire tuberosity, including its posterior aspect, is uncovered for visualization and instrumentation. Radiographic information is used to determine the proper drilling angle necessary to avoid perforation of the posterior sinus wall. The drill entry point is often marked 3-4 mm in front of the posterior region of the tuberosity. The drill axis runs towards the palate at about 20-30° in the horizontal plane and about 45° from the maxillary plane. Drilling with a pilot drill continues up to the pterygopalatine-tuberosity suture, which is the anchorage region for a pterygoid implant. Three different types of drills are used for insertion. All preparation is done in an underprepared mode, at a working speed of 600 rpm or manually. The implant is then inserted manually using a bone condensation technique, due to its self-tapping and compressive characteristics. The implant is anchored in the pterygoid plate of the sphenoid bone, through the maxillary and palatine bones and with distal angulation between 35° and 55°, depending on the maxillary sinus floor and the height of the bone of the tuberosity.

Various modifications of the above surgical techniques have been proposed by different authors. Reasons for modifications are, to reduce surgical trauma, to increase primary stability and to reduce the failure rate of the pterygoid implant. One of such modification was proposed by Venturelli et al. [15]. His aim is to reduce the failure rates of implants placed in the maxillary tuberosity with the modified technique. In the modified technique a crestal incision was made from the pterygomaxillary notch to the premolar area, with a releasing vertical incision. Then the buccal and palatal flaps were carefully raised. The site is prepared with care to minimize drilling maneuvers. Drilling begins with a 2.0-mm round drill at 1,500 rpm through the cortical bone. Then, a 2.0-mm twist drill at 500 rpm is used to the depth of the superior cortical plate. The depth of the drilled site is measured with a depth gauge, and the integrity of the sinus membrane is verified. If damage to the sinus membrane is revealed, a new more distal site is selected, and the described sequence is repeated. All subsequent drilling is done with internal irrigation drills.

A pilot drill is then used to shape the whole entrance. After using a 2.5-mm shaping drill, a 3.0-mm trispade cylinder bur at 200 rpm is recommended until the predefined depth is reached. Single-stroke drilling is advised to avoid overextending the site in the poor quality bone. To avoid damaging thin cortical bone, countersinking is not used. Tapping is also avoided because of the particular quality of bone present. Implants are then placed with standard implant mounts (3 mm). A self-tapping implant is first placed at 15 rpm. The implant is removed if minimal instability is seen and replaced immediately with a 4.0-mm-diameter implant without any further drilling. The proposed variations in the standard protocol are aimed at minimizing surgical trauma to the bone and reduce the amount of heat generated. This is expected to reduce the high failure rates (usually during stage 2 surgery) for implants placed in the maxillary tuberosity according to Venturelli et al. [15]. For the new pterygoid implants, a different insertion technique is used. The surgical technique uses a single drill at a working speed of 600 rpm and the implant insertion is done by hand. This technique is termed Soft technique. The Soft technique was invented to enhance implant primary stability and encourage early prosthodontic restoration Figure 3.

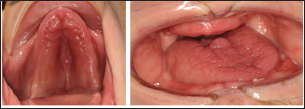
Figure 3: Clinical photo of the patient at presentation: hypo plastic upper arch can be seen.

Lupinepublishers-openaccess-dentistry-oral-healthcare

Case Presentations

Patient 1 is a 47-year-old non-smoker, male patient with Down syndrome, who presented at the clinic with a reason to get fixed teeth in the maxilla and mandible. A clinical examination showed an edentulous lower arch with resorbed ridge and an edentulous upper arch with sagittal and transverse hypo plasia. Figure 3 shows the clinical photo of the patient at presentation: hypo plastic upper arch can be seen. The Radiographic examination using an orthopantomogram showed an edentulous upper jaw with moderate vertical bone resorption in the front and severe vertical resorption in the premolar and molar region. In the lower jaw, there is a moderate vertical bone resorption. Figure 4 shows the panoramic radiograph of the patient at presentation.

Figure 4: Panoramic radiograph of the patient at presentation.

Lupinepublishers-openaccess-dentistry-oral-healthcare

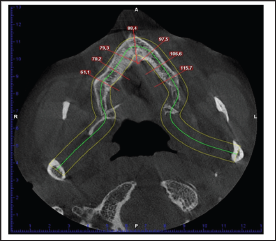
a) Treatment Plan: In the lower jaw, placement of four standard implants was advised. From a prosthetic point of view, the patient desired a fixed prosthetic solution. For the upper jaw placement of Zygoma implant was planned, this was changed after 3D assessment of the upper jaw showed severe atrophic maxilla with insufficient bone and space for zygoma implant (Figure 5), then a combination of two pterygoid and four hybrid plates was proposed. The patient agreed to this treatment plan.

Figure 5: Cone beam computed tomography image of patient at presentation showing shape and width of upper arch.

Lupinepublishers-openaccess-dentistry-oral-healthcare

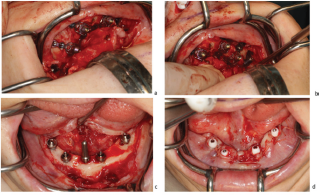
Figure 6: Surgical procedure and implant placement in the maxilla (a, b) and mandible (c, d).

Lupinepublishers-openaccess-dentistry-oral-healthcare

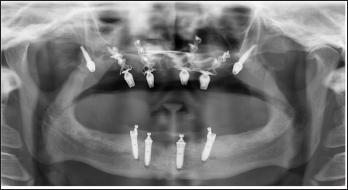
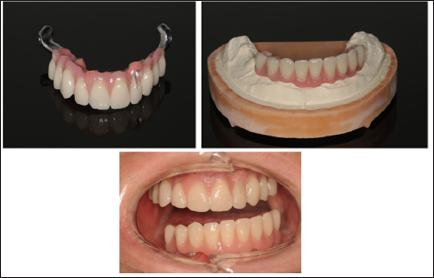
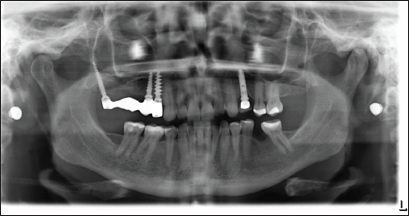
In the maxilla, an open flap was made from the left tuberosity along the crest till the canine region. The flap was reflected on the vestibular side in positions 17 and 27 of the zygomatic arch; flap was also reflected in the palate. Pterygoid implant P3.5/20mm was inserted at the left and right pterygoid plate. Two-hybrid plates HENGG-2 (Highly efficient no graft gear) were fixed at positions 22 and 25. The plates were fixed with osteosynthesis screws and covered with MatriboneR. The procedure was quite similar to the right side. Two plates HENGG-2 were installed at position 12 and15. The flap was then closed on the left and right with polytetrafluoroethylene polymer (PTFE) monofilament non-absorbable suture. In the lower jaw, a crestal incision was made from 35 to 45 and four Nobel Speedy Groovy RP 4x13 mm implants were placed at region 35, 32, 42 and 45 with a minimum torque of 50N (Figures 6 & 7). After surgery, an impression was taken with transfer coping in place. Weeks later, a try-in was done and a new bite registration was taken. A laboratory technician was present at this session to decide the smile line and aesthetic outlook. Five days after the try-in an appointment for prosthesis delivery was given. In the maxilla, the bridge was screwed, and in the mandible, the bridge was fixed with temporary cement (Figure 8). The patient was reviewed after 2 weeks. Thereafter, the patient was scheduled for follow-up at 3 months and then every 6 months.

Figure 7: Panoramic radiograph of patient after implant placement.

Lupinepublishers-openaccess-dentistry-oral-healthcare

Figure 8: Images of prosthesis and patient at completion of treatment

Lupinepublishers-openaccess-dentistry-oral-healthcare

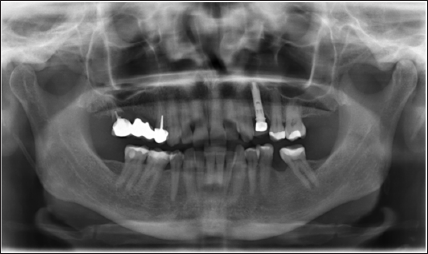
Figure 9: Panoramic radiograph of patient 2 at presentation.

Lupinepublishers-openaccess-dentistry-oral-healthcare

Patient 2 is a 49-year-old female, who lost her bridge on the right maxilla. The patient presented at the clinic with a reason to get fixed teeth to replace the defective bridge. A clinical examination showed fractures of teeth retaining the bridge. Radiographic examination using an orthopantomogram showed pin retained bridge on compromised teeth in the right maxilla (Figure 9). In the lower jaw, several teeth were present. The proposed treatment plan was the placement of a combination of pterygoid and two C 3.5 /14 mm ROOTT one-piece implants. The patient agreed to this treatment plan. In the maxilla, the broken teeth were extracted and an open flap was made from the right tuberosity along the crest till the canine region. The flap was reflected on the vestibular side in positions 26 and 27 of the zygomatic arch; flap was also reflected in the palate. Pterygoid implant P3.5/20mm was inserted at the right pterygoid plate. Thereafter, one-piece implants of 3.5mm diameter and height of 12mm were inserted in positions 14, 15 with a torque of 50N. The flap was then closed with polytetrafluoroethylene polymer (PTFE) monofilament non-absorbable suture. After an implant placement, bite registration was done. Then transfer coping was inserted and an impression was taken with silicone immediately after the surgery (Figures 10 & 11). Four days after the framework, a try-in was done. Ten days after the try-in an appointment for prosthesis delivery was given. In the maxilla, the metal-ceramic bridge was screwed. The patient was reviewed after 2 weeks. Thereafter, the patient was scheduled for follow-up at 3 months and then every 6 months.

Figure 10: Laboratory step.

Lupinepublishers-openaccess-dentistry-oral-healthcare

Figure 11: Laboratory step.

Lupinepublishers-openaccess-dentistry-oral-healthcare

Discussion

Pterygoid implants provide strong cortical anchorage in the maxilla. It is an alternative treatment option for patients with highly atrophic maxillae without the need for extensive augmentation procedures. The availability of dense cortical bone for engagement of the implant encourages its use. The location of the posterior implant is dictated by the dimensions and quality of the tuberosity. The mesiodistal angulation of the implant is dictated by the angle of the posterior wall of the sinus and its proximity to the posterior wall of the tuberosity. The bucco-palatal angulation of the implant is dictated by the bone segments to be engaged. Previous studies show that Pterygoid implants have high success rates, similar bone loss levels to those of conventional implants, minimal complications and good acceptance by patients [1,16]. Two anatomic locations in which implants are placed in the retro molar area can be distinguished in the literature, these are the pterygoid process and the pterygomaxillary region.

Implant lengths and angulations vary between these two locations. Though the results are promising, case selection is very important and a thorough understanding of the pitfalls of the procedure should be borne in mind. The lack of need for maxillary sinus lift and grafting procedures shorten the treatment time considerably and allow immediate loading of the pterygoid implant [13]. Pterygoidimplants allow the prosthesis to have sufficient posterior extensions there by eliminate distal cantilevers [13,16]. Because the anatomy of the posterior region is complex and poorly described; training and experience is needed in order to achieve a good result. Pterygoid implant is technique sensitive and learning curve is usually required, its proximity to vital anatomic structures and poor access for clinicians and patients are its shortcomings [12,13,16]. In the above case reports, new Pterygoid implants were used for patient rehabilitation with "soft technique" described above. The use of new pterygoid implants to support a fixed prosthesis was demonstrated to be a reliable, predictable alternative to distal cantilever prostheses or sinus-lifting procedures. This technique has good success rate and it ensures short treatment period.

Read More Modern Approaches in Dentistry and Oral Health Care (MADOHC) Click on Below Link: https://lupine-dentistry-oral-health-care.blogspot.com/