Lupine Publishers| Modern Approaches in Dentistry and Oral Health Care

Abstract
Restoration of a severely atrophic jaw presents a challenge in dentistry. Bone augmentation is usually required in the posterior maxilla to enable placement of a sufficient number and length of implants to support implant prosthesis due to the poor bone quality of the posterior maxilla. The recent invention of new surgical techniques and implant systems help circumvent the current restorative problems and provide a solution to erstwhile un-rehabilitated cases. The use of pterygoid implants in the pterygo-maxillary region provides posterior bone support without sinus augmentation or supplemental grafts. This article describes a clinical procedure for the restoration of severely resorbed maxilla using a new pterygoid implant in combination with conventional or cortically fixed implant system. In the present study, the use of implants in the posterior maxilla to support a fixed prosthesis was demonstrated to be a reliable and a good alternative to distal cantilever prostheses or sinus-lifting procedures.
Keywords: Atrophic Jaw; Pterygoid Implants; Pterygo-maxillary Region; Edentulous Patient; Rehabilitation
Introduction
Restoration of a severely atrophic jaw presents a challenge in dentistry. The poor bone quality of the posterior maxilla, coupled with limited vertical bone height due to sinus pneumatisation and chronic periodontitis often leaves insufficient bone for implant anchorage [1,2]. Bone augmentation is usually required to enable placement of a sufficient number and length of implants to support implant prosthesis [3,4]. Many procedures, such as onlay grafts, free or micro vascular bone grafts, transport distraction osteogenesis, and apposition grafts with or without a Le Fort I osteotomy are well documented and have success rates of between 60-90% [5-9]. These often involve invasive and lengthy surgeries, long treatment time, and some morbidity [6-8]. Furthermore, free bone grafts are commonly associated with resorption during healing [5,9]. Zygomatic Implants have been used to provide support for oral rehabilitation where there has been a substantial amount of bone loss from the upper jaw, and where ordinary dental implants are not sufficient for prosthetic support [2,10].
Still, some severe atrophic jaw cases defile these current treatment options. Continuous advances in dentistry have resulted in the invention of new surgical techniques and implant systems that circumvent the current restorative problems and provide a solution to erstwhile un-rehabilitated cases. One of such is the use of Pterygoid implants to rehabilitate posterior maxillal. Placement of implants in the pterygomaxillary region provides posterior bone support without sinus augmentation or supplemental grafts. This article describes a clinical procedure for the restoration of severely resorbed maxilla using a new terygoidimplant in combination with conventional or cortically fixed implant system.
The Pterygoid Implant
The pterygoid implant is anaxial implant placed through the maxillary tuberosity with fixation apically in the pterygoid process of the sphenoid bone and the pyramidal process of the palatine bone. Pterygoid implants were first proposed by Linkow in 1975 [11] and the method was first described by JF Tulasne in 1992 [12]. These implants are relatively long and specifically manufactured with the characteristics of the pterygoid region in mind. The implant was introduced to solve the problem of implants restoration in the posterior maxilla due to the presence of the maxillary sinusand as a result of limited quantity and poor quality of available bone in this region [1]. Support for pterygoid implantsis derived from the tuberosity of the maxillary bone, the pyramidal process of the palatine bone, and the pterygoid process of the sphenoid bone [13]. The length of pterygoid implant ensures that the implant can cross the mucosa (which is often thick in this region) and engage the implant apex in the cortical bone of the pterygopalatine suture.
Figure 1: Pterygoid implant.
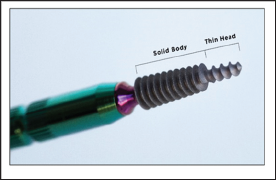
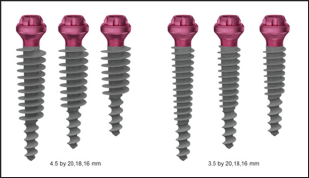
Pterygoid implant passes through the maxillary tuberosity and the pyramidal process of palatine bone to engage the pterygoid process of the sphenoid bone [13,14], its length ranges from 16 to 20 mm, they have a pointed, self-tapping apex to ensure strong anchorage when inserted. The implant neck has a wide thread profile which provides compression in the region of the tuberosity, where the bone is often of low density (Figure 1). New Pterygoid implants designed under the guidance of Henri Diederich, Luxembourg with the collaboration of the Swiss company TRATE are surface treatedithhydroxyapatite/tricalciumphosphate (HA/ TCP) and have a conical shape with compressive threads. The implants are of 3.5 or 4.5 mm diameter with a length of 16, 18, 20 mm respectively (Figure 2).
Figure 2: New Pterygoid implants from TRATE.
Surgical Technique
The placement of implants in the pterygoid process requires surgical experience and detailed knowledge of the anatomy of the posterior maxillary region. Various surgical techniques for implant insertion in this region have been described in the literature. The standard surgical technique involves; making a full-thickness crestal incision on an edentulous crest as far as the back of the tuberosity, and extended by a vestibular releasing incision after anaesthesia of the region is achieved with a local anaesthetic solution. The incision design is such that the entire tuberosity, including its posterior aspect, is uncovered for visualization and instrumentation. Radiographic information is used to determine the proper drilling angle necessary to avoid perforation of the posterior sinus wall. The drill entry point is often marked 3-4 mm in front of the posterior region of the tuberosity. The drill axis runs towards the palate at about 20-30° in the horizontal plane and about 45° from the maxillary plane. Drilling with a pilot drill continues up to the pterygopalatine-tuberosity suture, which is the anchorage region for a pterygoid implant. Three different types of drills are used for insertion. All preparation is done in an underprepared mode, at a working speed of 600 rpm or manually. The implant is then inserted manually using a bone condensation technique, due to its self-tapping and compressive characteristics. The implant is anchored in the pterygoid plate of the sphenoid bone, through the maxillary and palatine bones and with distal angulation between 35° and 55°, depending on the maxillary sinus floor and the height of the bone of the tuberosity.
Various modifications of the above surgical techniques have been proposed by different authors. Reasons for modifications are, to reduce surgical trauma, to increase primary stability and to reduce the failure rate of the pterygoid implant. One of such modification was proposed by Venturelli et al. [15]. His aim is to reduce the failure rates of implants placed in the maxillary tuberosity with the modified technique. In the modified technique a crestal incision was made from the pterygomaxillary notch to the premolar area, with a releasing vertical incision. Then the buccal and palatal flaps were carefully raised. The site is prepared with care to minimize drilling maneuvers. Drilling begins with a 2.0-mm round drill at 1,500 rpm through the cortical bone. Then, a 2.0-mm twist drill at 500 rpm is used to the depth of the superior cortical plate. The depth of the drilled site is measured with a depth gauge, and the integrity of the sinus membrane is verified. If damage to the sinus membrane is revealed, a new more distal site is selected, and the described sequence is repeated. All subsequent drilling is done with internal irrigation drills.
A pilot drill is then used to shape the whole entrance. After using a 2.5-mm shaping drill, a 3.0-mm trispade cylinder bur at 200 rpm is recommended until the predefined depth is reached. Single-stroke drilling is advised to avoid overextending the site in the poor quality bone. To avoid damaging thin cortical bone, countersinking is not used. Tapping is also avoided because of the particular quality of bone present. Implants are then placed with standard implant mounts (3 mm). A self-tapping implant is first placed at 15 rpm. The implant is removed if minimal instability is seen and replaced immediately with a 4.0-mm-diameter implant without any further drilling. The proposed variations in the standard protocol are aimed at minimizing surgical trauma to the bone and reduce the amount of heat generated. This is expected to reduce the high failure rates (usually during stage 2 surgery) for implants placed in the maxillary tuberosity according to Venturelli et al. [15]. For the new pterygoid implants, a different insertion technique is used. The surgical technique uses a single drill at a working speed of 600 rpm and the implant insertion is done by hand. This technique is termed Soft technique. The Soft technique was invented to enhance implant primary stability and encourage early prosthodontic restoration Figure 3.
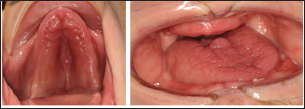
Figure 3: Clinical photo of the patient at presentation: hypo plastic upper arch can be seen.
Case Presentations
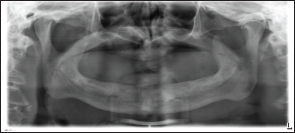
Patient 1 is a 47-year-old non-smoker, male patient with Down syndrome, who presented at the clinic with a reason to get fixed teeth in the maxilla and mandible. A clinical examination showed an edentulous lower arch with resorbed ridge and an edentulous upper arch with sagittal and transverse hypo plasia. Figure 3 shows the clinical photo of the patient at presentation: hypo plastic upper arch can be seen. The Radiographic examination using an orthopantomogram showed an edentulous upper jaw with moderate vertical bone resorption in the front and severe vertical resorption in the premolar and molar region. In the lower jaw, there is a moderate vertical bone resorption. Figure 4 shows the panoramic radiograph of the patient at presentation.
Figure 4: Panoramic radiograph of the patient at presentation.
a) Treatment Plan: In the lower jaw, placement of four standard implants was advised. From a prosthetic point of view, the patient desired a fixed prosthetic solution. For the upper jaw placement of Zygoma implant was planned, this was changed after 3D assessment of the upper jaw showed severe atrophic maxilla with insufficient bone and space for zygoma implant (Figure 5), then a combination of two pterygoid and four hybrid plates was proposed. The patient agreed to this treatment plan.
Figure 5: Cone beam computed tomography image of patient at presentation showing shape and width of upper arch.
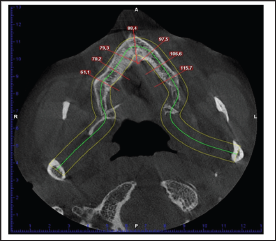
Figure 6: Surgical procedure and implant placement in the maxilla (a, b) and mandible (c, d).
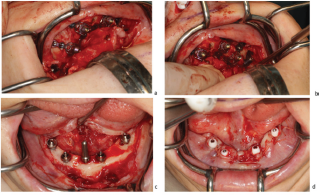
In the maxilla, an open flap was made from the left tuberosity along the crest till the canine region. The flap was reflected on the vestibular side in positions 17 and 27 of the zygomatic arch; flap was also reflected in the palate. Pterygoid implant P3.5/20mm was inserted at the left and right pterygoid plate. Two-hybrid plates HENGG-2 (Highly efficient no graft gear) were fixed at positions 22 and 25. The plates were fixed with osteosynthesis screws and covered with MatriboneR. The procedure was quite similar to the right side. Two plates HENGG-2 were installed at position 12 and15. The flap was then closed on the left and right with polytetrafluoroethylene polymer (PTFE) monofilament non-absorbable suture. In the lower jaw, a crestal incision was made from 35 to 45 and four Nobel Speedy Groovy RP 4x13 mm implants were placed at region 35, 32, 42 and 45 with a minimum torque of 50N (Figures 6 & 7). After surgery, an impression was taken with transfer coping in place. Weeks later, a try-in was done and a new bite registration was taken. A laboratory technician was present at this session to decide the smile line and aesthetic outlook. Five days after the try-in an appointment for prosthesis delivery was given. In the maxilla, the bridge was screwed, and in the mandible, the bridge was fixed with temporary cement (Figure 8). The patient was reviewed after 2 weeks. Thereafter, the patient was scheduled for follow-up at 3 months and then every 6 months.
Figure 7: Panoramic radiograph of patient after implant placement.
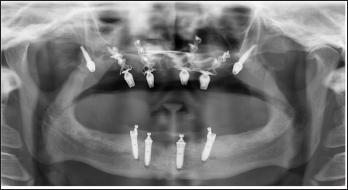
Figure 8: Images of prosthesis and patient at completion of treatment
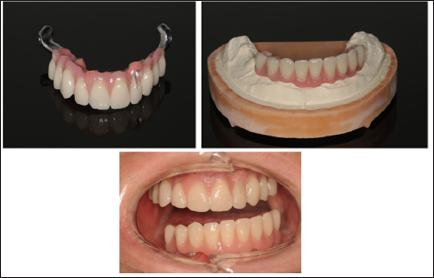
Figure 9: Panoramic radiograph of patient 2 at presentation.
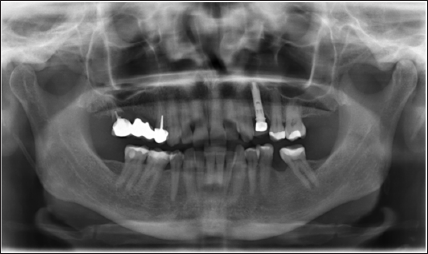
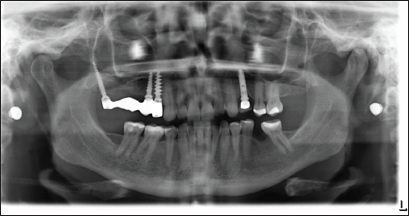
Patient 2 is a 49-year-old female, who lost her bridge on the right maxilla. The patient presented at the clinic with a reason to get fixed teeth to replace the defective bridge. A clinical examination showed fractures of teeth retaining the bridge. Radiographic examination using an orthopantomogram showed pin retained bridge on compromised teeth in the right maxilla (Figure 9). In the lower jaw, several teeth were present. The proposed treatment plan was the placement of a combination of pterygoid and two C 3.5 /14 mm ROOTT one-piece implants. The patient agreed to this treatment plan. In the maxilla, the broken teeth were extracted and an open flap was made from the right tuberosity along the crest till the canine region. The flap was reflected on the vestibular side in positions 26 and 27 of the zygomatic arch; flap was also reflected in the palate. Pterygoid implant P3.5/20mm was inserted at the right pterygoid plate. Thereafter, one-piece implants of 3.5mm diameter and height of 12mm were inserted in positions 14, 15 with a torque of 50N. The flap was then closed with polytetrafluoroethylene polymer (PTFE) monofilament non-absorbable suture. After an implant placement, bite registration was done. Then transfer coping was inserted and an impression was taken with silicone immediately after the surgery (Figures 10 & 11). Four days after the framework, a try-in was done. Ten days after the try-in an appointment for prosthesis delivery was given. In the maxilla, the metal-ceramic bridge was screwed. The patient was reviewed after 2 weeks. Thereafter, the patient was scheduled for follow-up at 3 months and then every 6 months.
Figure 10: Laboratory step.
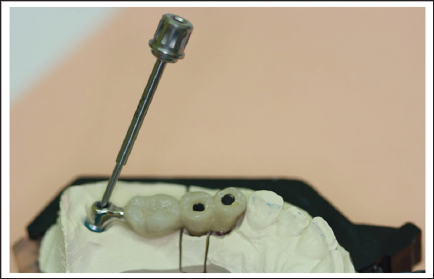
Figure 11: Laboratory step.
Discussion
Pterygoid implants provide strong cortical anchorage in the maxilla. It is an alternative treatment option for patients with highly atrophic maxillae without the need for extensive augmentation procedures. The availability of dense cortical bone for engagement of the implant encourages its use. The location of the posterior implant is dictated by the dimensions and quality of the tuberosity. The mesiodistal angulation of the implant is dictated by the angle of the posterior wall of the sinus and its proximity to the posterior wall of the tuberosity. The bucco-palatal angulation of the implant is dictated by the bone segments to be engaged. Previous studies show that Pterygoid implants have high success rates, similar bone loss levels to those of conventional implants, minimal complications and good acceptance by patients [1,16]. Two anatomic locations in which implants are placed in the retro molar area can be distinguished in the literature, these are the pterygoid process and the pterygomaxillary region.
Implant lengths and angulations vary between these two locations. Though the results are promising, case selection is very important and a thorough understanding of the pitfalls of the procedure should be borne in mind. The lack of need for maxillary sinus lift and grafting procedures shorten the treatment time considerably and allow immediate loading of the pterygoid implant [13]. Pterygoidimplants allow the prosthesis to have sufficient posterior extensions there by eliminate distal cantilevers [13,16]. Because the anatomy of the posterior region is complex and poorly described; training and experience is needed in order to achieve a good result. Pterygoid implant is technique sensitive and learning curve is usually required, its proximity to vital anatomic structures and poor access for clinicians and patients are its shortcomings [12,13,16]. In the above case reports, new Pterygoid implants were used for patient rehabilitation with "soft technique" described above. The use of new pterygoid implants to support a fixed prosthesis was demonstrated to be a reliable, predictable alternative to distal cantilever prostheses or sinus-lifting procedures. This technique has good success rate and it ensures short treatment period.
Read More Modern Approaches in Dentistry and Oral Health Care (MADOHC) Click on Below Link: https://lupine-dentistry-oral-health-care.blogspot.com/

