Lupine Publishers| Journal of Material Science
Abstract
Pores in the weld metal lower the mechanical properties of the weld. It is therefore important to understand the pore formation mechanisms and find procedures that could reduce porosity. This study focused on laser welding of 3 mm thick magnesium alloy AM50, investigating how different parameters affect porosity formation. Low levels of porosity content were achieved by either increasing the welding speed or using a two-pass welding approach. It was found that higher welding speeds did not allow pores, which were pre-existing from the die-casting process, to have sufficient time to coalesce and expand. In the two-pass welding technique, pores were removed as a result of a degassing process which occurred through the second pass.
Keywords: Laser welding; Magnesium, Cast; Metallurgy; Porosity; Automotive; AM50
Introduction
Magnesium alloys are light-weight metals suitable for applications in several industries, such as automotive and aerospace. Compared with most materials they provide a possibility to reduce weight due to their high specific strength. However, their tensile strength is low (190-310MPa) compared with steels, which may limit their application; for example, to car interior parts such as seat frames, steering wheels or structural dashboard cross beams [1-4]. A common magnesium alloy is AM50 (4.4-5.5 wt% Al, 0.26-0.6 wt% Mn) which, compared with other magnesium alloys, is of relatively high strength, high hardness, high elongation and has excellent castability. Often magnesium alloys are cast into complex shapes using high pressure die-casting [5-8]. An alternative is to cast less complicated parts and join them by welding, commonly by tungsten inert gas (TIG) or metal inert gas (MIG) welding [2]. An alternative is laser welding, where high power densities are attained with small welding spots, allowing relatively high welding speed and low heat inputs to be achieved. Low heat input is an advantage for many metallic materials as a narrow fusion zone and HAZ will form, reducing negative effects on material properties [2]. Laser welding of magnesium alloys was reviewed by [9], who stated that crack-free laser welds with low porosity and good surface quality could be obtained when using appropriate welding parameters. Nevertheless, magnesium alloys may exhibit many processing problems and weld discontinuities, such as an unstable weld pool, spatter, drop-through, sagging, undercut, porosity, cracking, and oxide inclusions. Pores in the weld metal lower especially the tensile strength and may have a deleterious effect on fatigue performance if surface breaking. Therefore, it is important to understand the pore formation mechanisms and find procedures that could be used to reduce pore formation [2,10]. Porosity in welded magnesium alloys has been the subject of a number of previous investigations [2,10-15]. In these studies, a range of different factors have been found to cause pore formation including: hydrogen, an unstable keyhole, pre-existing pores from the die-cast process, surface condition, gas entrapment, and alloying elements with a low vaporization temperature. In studies by [15] and [11] porosity in laser welded AM60B (Mg-alloy with 5.5-6.5 wt.% Al and 0.24-0.6 wt.% Mn) was investigated. Pre-existing pores in the base metal coalesced and expanded in the weld metal during welding resulting in large diameter pores [16] presented three solutions to avoid porosity; specifically, removing the oxide layer with a separate plasma arc before welding, use of dual laser beam welding or using a two-pass laser welding procedure. The best results were obtained using a two-pass welding, with a pre-heating configuration for the first laser pass. However, a systematic study of how different parameters affect the amount of porosity in laser welded AM50 has not been previously performed. This study was therefore initiated to investigate how different parameters affect porosity formation in laser welded AM50, with the overall aim to ensure that high quality welds can be produced reliably and reproducibly. Investigations were undertaken on 3mm thickness AM50, since this is of common interest to many potential applications.
Experimental
Material
Die-cast magnesium alloy AM50 sheets of dimensions 3(T) x100(L)x170(W) mm were welded. The composition according to ISO 16220(00) and the composition measured with glow-discharge optical emission spectroscopy are presented in Table 1.
Welding
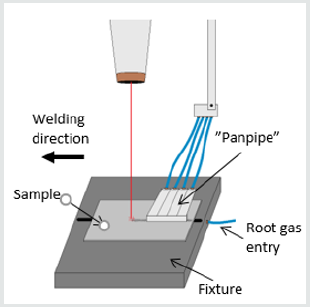
Figure 1: Schematic image of the laser welding setup. A trailing gas shielding was used on the top side with a ‘panpipe’ design, and root gas was applied through a 10mm wide efflux channel in the fixture along the weld line.

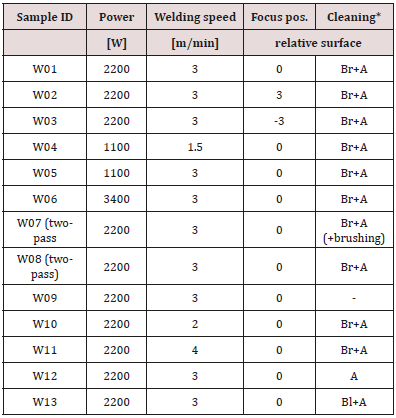
Welding was performed with an IPG 10kW fiber laser with a delivery fiber of 200μm core diameter. A 120mm focal length collimator lens and a 400mm focal length focusing lens were used, giving a nominal beam width of 0.66mm diameter the optics were aligned perpendicular to the sheet with the beam width on the top surface of the workpiece. Bead-on-plate welds, 100mm in length, were produced. Argon gas with a purity >99.99% (gas type I1 to ISO 14175:2008) was used as shielding gas at the top and root sides, with flow rates of 40 l/min and 5 l/min, respectively. On the top side a trailing gas shielding was used with a ‘panpipe’ design. The root gas was applied through a 10mm wide efflux channel in the fixture along the weld line Figure 1. Laser welding parameters and surface conditions were varied to study their influence on porosity formation. The welding parameters varied were power, welding speed and focus position (the laser beams minimum diameter with respect to the top surface of the workpiece). The surface condition was varied through different cleaning procedures, specifically wire brushing (Br), acetone degreasing (A) and grit blasting (Bl). In addition, single or two-pass welding was used Table 2. For the twopass welding, both passes were resulting in full penetration welds i.e. not a pre-heating setup.
Table 2: Parameters and cleaning procedure. Specimens W07 and W08 were welded with two passes. For W07, loose welding soot was removed with a soft brush between the passes.

*Br=Wire brushing, A=Acetone, Bl=Grit blasting
Evaluation
Metallographic cross-sections, both transverse and longitudinal to the welding direction were prepared to study the resulting microstructure and porosity of the welds. The longitudinal sections were cut from the centre of the weld with a length of 20mm. All sections were grinded with 4000 grit paper, and polished with either a 6 or 1μm diamond suspension slurry for the LOM (Light Optical Microscopy) evaluation or and the SEM (Scanning Electron Microscopy) evaluation respectively. When performing LOM, an external ring-shaped light source (directed from the sides onto the sample) was used to provide additional illumination and increase visibility of the pores. This yielded a high contrast image suitable for image analysis using ‘Image J’, an open source Java-based image processing software [17]. A JEOL JSM-7001F field emission SEM equipped with a back-scatter detector and an Oxford Instruments EDS (Energy Dispersive Spectrometry) detector was used for microstructure studies and phase analysis.
Result
Microstructure
EDS analysis showed that the matrix of the as-received AM50 sheet material contained a Mg-Al phase (corresponding to β-Mg17Al12 according to literature [18]), particles of Al- Mn (typically Al8Mn5 [18]) and as Mg-Al oxides Figure 2. Also, occasional cavities were found in the base material. These are most likely shrinkage pores from the high-pressure die-casting process.
Figure 2: Cross section images of AM50 weld obtained using the back scattered detector in SEM showing (a) base material and (b) fusion zone. White areas are a Mg-Al and Al-Mn phases. Black areas are shrinkage pores from die-casting (1), Mg-Al oxides (2) or pores from welding (3).

Porosity
Figure 3: LOM micrograph of a longitudinal section of W01, obtained using an external ring shaped light source.

Table 3: Transverse and longitudinal cross-sections porosity content, including number of pores in the section as well as area fraction.

*Br=Wire brushing, A=Acetone, Bl=Grit blasting
The porosity analysis was typically performed using images taken of the cross-section’s transverse to the welding direction. Longitudinal section images Figure 3 were also analyzed to verify that the transverse cross-sectional images were representative of the full length of the weld. Table 3 details the number of pores, including the percentage of the fusion zone cross-sectional area covered by pores (hereafter ‘area fraction pores’). The porosity counts in the transverse cross-sections show a good correlation with the porosity counts in the longitudinal cross-sections, suggesting that cross-sectional porosity is representative and can be used for evaluation. The size distribution of pores was analyzed for samples welded at three different welding speeds; specifically, 2m/min (W10), 3m/min (W01) and 4m/min (W11). Most pores had a radius in the range 10-40μm, independent of welding speed. However, for the lowest welding speed (2m/min) some pores exceeded 100μm in radius (Figure 4).
Figure 4: Graph showing the size distibution of pores for three welding speeds: 2 m/min (W10) 3 m/min (W01) and 4 m/min (W11). Most pores were in the size of 10-40 μm. Welding speed 2 m/min has some large pores in the size of >100 μm in radius.
Read More About Lupine Publishers Journal of Material Science Please Click on Below Link:https://lupine-publishers-material-science.blogspot.com


No comments:
Post a Comment
Note: only a member of this blog may post a comment.